
Graham Beattie, Senior Health and Science Editor.
There is a particular kind of morning that starts at the bathroom mirror with three half-used bottles lined up on the shelf, none of them quite right. One turns orange by noon. One sits in the pores like plaster. One simply vanished somewhere around the second hour. The question that gets typed into a search bar afterwards is usually some version of why does my foundation never look like it did in the shop.
The answer has less to do with willpower or the right brand and more to do with a handful of things nobody explains at the counter: how pigment behaves once it meets skin oil and air, why lighting lies, and why the sample on the back of your hand has nothing to do with your face. This guide walks through those mechanics in plain terms, with self-tests you can run at home, so that the next bottle you pick up is one you actually finish.
One fact worth knowing before anything else: foundation shades are not fixed colours sitting in a bottle. Many contain iron oxide pigments that shift slightly as they react with oxygen and skin oil over the course of a few hours. That single fact explains more shade-matching disappointment than any other single cause.
- Undertone matters more than depth alone: a shade that is the right lightness but the wrong warmth will always look slightly wrong, however precisely it matches your skin’s darkness.
- Foundation changes colour after application: pigments react with air and oil over roughly one to three hours, so a lunchtime check tells you more than a mirror check at 8am.
- Finish is chemistry, not marketing: matte, dewy and satin describe how much oil-absorbing or light-reflecting ingredient the formula contains, and choosing against your skin’s actual oil level is the single most common mistake.
Finding Your Undertone In Daylight
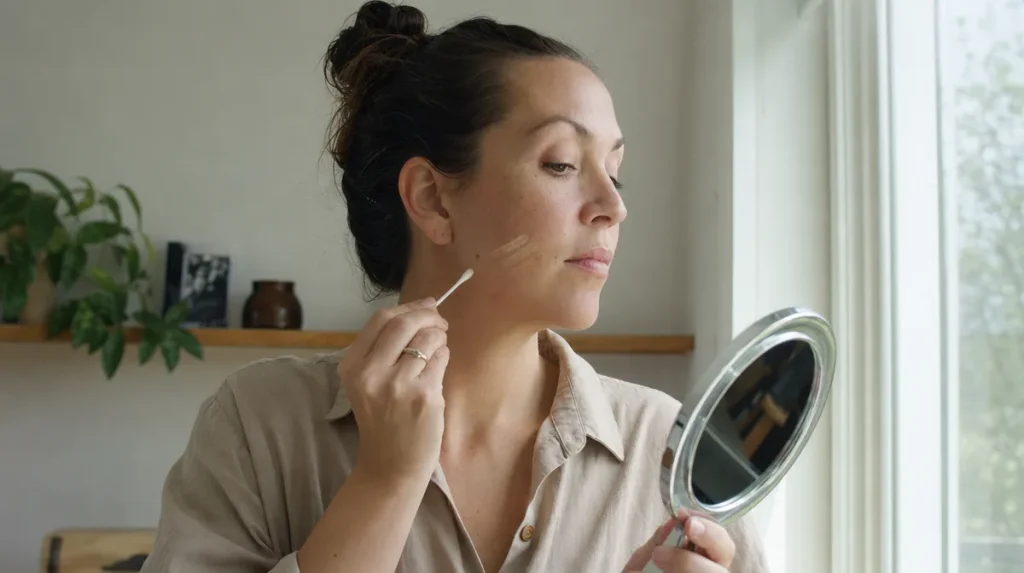
Depth is how light or dark your skin is. Undertone is the underlying warmth or coolness beneath that depth, and it stays roughly constant even as your skin tans or pales through the year. Think of choosing paint for a room: two chips can be the same brightness but one leans yellow and the other leans pink, and hanging the wrong one on the wall makes the whole room feel off, even if nobody can say exactly why.
The old tricks (checking your veins, noticing whether gold or silver jewellery flatters you more) are folklore rather than science, and dermatology guidance does not treat them as reliable. A more useful method: stand in natural daylight, away from any window tint or overhead bulb, and swatch three shades in a diagonal stripe along your jawline, blending each edge slightly into your neck. Wait two or three minutes. The stripe that seems to disappear, rather than sitting as a visible band, is your undertone family.
The most common mistake is testing on the inside of the wrist, where skin is thinner, less sun-exposed and often a different undertone entirely from the face. The second most common mistake is testing under a shop’s overhead lighting, which frequently carries a yellow or cool cast that will mislead even a careful eye. If you must test indoors, walk to the nearest window or doorway before deciding.
Self-test: photograph the jawline swatch on your phone with flash turned off, in daylight, then look at the photo rather than your face directly. Cameras are often more honest than mirrors about which stripe actually blends.
Matching Depth Without Guessing
Depth mistakes usually come from testing in the wrong place or trusting the wrong light. Skin on the neck is frequently a shade or two lighter than the face because it sees less sun. Matching to the neck alone is a reliable way to end up with a foundation that reads too light on camera and slightly grey in person.
Fluorescent lighting, common in many shop bathrooms and changing areas, tends to flatten warmth and can make a correctly matched deeper shade look ashy or chalky, an effect dermatologists who work across a wide range of skin tones flag often in patient consultations. Daylight, or a warm white bulb at home, gives a truer read.
The method that avoids most of this: apply your three candidate shades along the jaw as described above, but this time judge them specifically by looking at the transition point where foundation meets bare neck skin. If there is a visible line or a colour jump, that shade is wrong, regardless of how good it looked on the back of your hand in the shop.
A mistake worth naming directly: assuming a single bottle needs to match your face in every season. Skin genuinely shifts depth with sun exposure, indoor heating and dry cold, so many people keep two shades in rotation rather than forcing one bottle to do both jobs. That is not overbuying. It is closer to keeping a summer and a winter coat.
Self-test: apply your chosen shade only to one half of your face, wait ten minutes in normal indoor light, then look in a mirror positioned near a window. If you can still find the boundary, move a half-shade in whichever direction closes the gap.
Understanding Finish: What Matte, Satin And Dewy Actually Mean
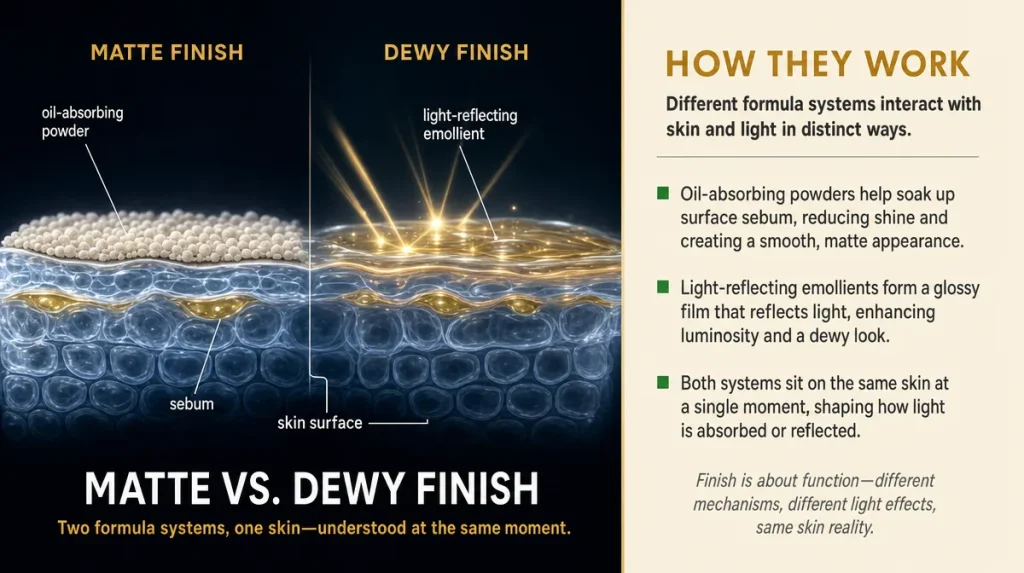
Finish is not a mood, it is a formulation choice. Matte foundations typically carry more silica, starch or clay-type powders that physically absorb surface oil, the way a chalk-based wall paint absorbs light rather than bouncing it back. Dewy formulas lean on glycerin, dimethicone or other emollients that sit on the skin and reflect light, similar to how a gloss paint catches the light in a room. Satin finishes sit in between, with a lighter dose of both.
The mistake most people make is choosing a finish based on how it looks on a shelf display rather than how their own skin behaves by midday. Oilier skin types applying a dewy formula often find it has slid into the T-zone within a few hours, because there is nothing in the formula to absorb the sebum the skin is already producing. Drier skin types applying a heavily matte formula frequently find it clings to flaky patches or fine lines, because there is no emollient to soften the texture underneath.
A useful rule of thumb from cosmetic chemists: match finish to your skin’s midday behaviour, not your skin’s morning appearance. If your forehead is shiny by early afternoon most days, lean toward a formula described as matte or oil-controlling. If your skin feels tight or flaky by evening, lean toward one described as hydrating, dewy or satin.
Self-test: press a clean tissue lightly against your forehead and chin around midday, before applying anything. A tissue that comes away with visible oil marks points toward a mattifying formula. A tissue that comes away clean, with skin that still feels dry to the touch, points toward something more emollient.
Coverage And The Thin-layer Method
Coverage is usually described as light, medium or full, but the more useful concept is buildability: how much a formula can be layered without turning heavy or patchy. Think of painting a wall with thin coats rather than one thick one. A single thick coat dries unevenly and shows brush marks. Several thin coats, each allowed to set before the next, build an even finish that still looks like a wall rather than a layer of paint sitting on top of one.
The same logic applies to skin. Applying a thin first layer, letting it set for roughly a minute, and only adding a second layer where genuinely needed (around blemishes, redness or under-eye shadows) tends to produce a more natural result than applying a thick single layer everywhere.
The most common mistake here is applying with fingers on a warm day or in humid conditions. Body heat softens the formula and can cause it to move and pool in creases faster than a brush or sponge application would, particularly in humid heat. A slightly damp sponge, dabbed rather than dragged, tends to deposit product more evenly and pick up any excess rather than pushing it into fine lines.
Self-test: after your final layer, run one clean finger lightly across your cheek. If product visibly drags, rolls, or leaves a streak, you have applied more than the skin can hold evenly, and the next application should use less product, added in thinner passes.
Where Inexpensive Formulas Actually Cut Corners
It is worth separating genuine formulation shortcuts from simple snobbery about price, because the two get confused often. Pigment grinding and dispersion technology, once the preserve of premium formulas, has become widely licensed across the industry over the past decade, which is one reason many mid-range foundations blend nearly as well as costlier ones.
Where cost differences do show up reliably: preservative systems, which affect how a formula ages once opened, and the fineness of pigment milling, which affects whether a formula looks slightly grainy or patchy in strong light. Formulation researchers presenting at International Federation of Societies of Cosmetic Chemists congress sessions have discussed how coarser pigment grinding, a common cost-saving step, can leave a visible texture under close-range or flash photography even when the shade match itself is accurate.
Another real, verifiable shortcut: wax content used as a cheap way to add slip and reduce the need for silicone-based smoothing agents. Formulas leaning heavily on wax can feel noticeably heavier on the skin and may settle into fine lines more visibly by the afternoon.
None of this means an inexpensive foundation is automatically poor, or that an expensive one is automatically excellent. It means the honest questions to ask before buying are about pigment fineness and preservation, not about the number on the price tag alone. A patch test, applied to the inner forearm and left for roughly 48 hours before facial use, is the kind of precaution the American Academy of Dermatology’s public guidance recommends for any new cosmetic product, and it tells you far more about how a formula will behave on your skin than its price does.
Oxidation: Why A Foundation Looks Different By Lunchtime
Many foundations contain iron oxide pigments, the same class of mineral colourant used to tint many cosmetics, and these pigments can shift subtly as they react with oxygen and with the oils naturally present on skin. The shift is usually toward a slightly warmer or deeper tone over roughly one to three hours after application, though the exact timing and degree vary by formula and by individual skin chemistry.
This is the single most common reason a shade that looked perfect in the shop mirror looks a shade too dark, or oddly orange, by early afternoon. It is not a flaw in your skin or a sign the shade was wrong. It is a predictable chemical process, and it is one reason experienced shoppers avoid buying a foundation on the strength of an in-store swatch alone.
The practical fix is patience rather than guesswork. Apply a swatch, or a small sample if the shop offers one, and go about an ordinary few hours of your day before deciding. If a retailer allows testers to be taken home, use that option. If not, applying the swatch early in a shopping trip and checking it again before you leave gives at least a partial read on how the shade is moving.
Self-test: apply your usual amount to one cheek in the morning, then check it again at the same time you would normally reapply or touch up, typically four to six hours later. If the colour has shifted noticeably warmer or darker, that is useful information for your next purchase, not a reason to distrust every foundation equally.
Tools And Technique: The Small Habits That Undo A Good Match
A correctly matched foundation can still look wrong if the application technique works against it. The most visible mistake is stopping the blend too abruptly at the jawline, leaving a soft but noticeable line where face colour meets neck colour, sometimes called a mask effect. Blending a small amount of product down onto the upper neck and along the hairline, rather than treating the jaw as a hard edge, avoids this almost entirely.
Fingers warm product quickly, which can help blend cream formulas but can also cause them to move unevenly on warmer days, pooling slightly in creases around the nose or under the eyes. A damp sponge tends to give a more controlled, even result for most formulas, because it removes excess product as it goes rather than pushing all of it into the skin. A brush, particularly a flat or slightly domed one, gives more precise control for building coverage only where needed.
A second common mistake is applying foundation directly to dry, uneven texture without any preparatory step. A thin layer of moisturiser, allowed to absorb for a minute or two beforehand, gives the formula something even to grip, which noticeably reduces the chance of it settling into fine lines or dry patches.
Self-test: after finishing your routine, check your jawline and hairline specifically in a mirror positioned in natural light, since these are the two areas where technique errors show first, well before anyone notices a shade mismatch on the cheek.
What Is Marketing Language And What Actually Matters
Packaging copy is where most confusion starts. Phrases like second skin, photo filter technology or all-day wear describe a feeling the brand wants you to expect, not a measurable property. They are not necessarily false, but they are not independently verified claims either, and no regulator requires evidence behind them the way it does for something like a stated SPF number.
SPF, by contrast, is a number with a testing standard behind it, and it is one of the few claims on a foundation label worth taking at face value. If sun protection matters to you day to day, checking the SPF figure itself is more useful than any wording around it.
Terms worth taking seriously for sensitive or reactive skin: fragrance-free, which means no added fragrance compounds, and non-comedogenic, a term formulators use to describe ingredients less likely to block pores, though it is not a guarantee for every individual. Terms worth treating as decoration: luxurious, radiant, glow-boosting. They describe intent, not chemistry.
A genuinely useful habit, drawn from general dermatological patch-testing advice available publicly through bodies such as the American Academy of Dermatology, is to apply any new formula to the inner forearm for roughly 48 hours before using it on the face, particularly if your skin reacts easily to new products. This single habit catches more irritation issues than reading any amount of packaging copy ever will.
The honest summary: read the ingredient and SPF information, treat the adjectives as marketing, and give any new formula a few hours on real skin, in real conditions, before deciding whether it earned its place on the shelf.
Key Takeaways
Undertone, tested in daylight along the jawline, matters more than depth alone. Foundation shades shift over one to three hours as pigments react with oxygen and skin oil, so judge a shade by lunchtime, not by the shop mirror. Finish should follow your skin’s actual midday oil level, not the display bottle. Coverage builds better in thin layers than one thick application. Price differences trace to pigment milling and preservation, not to blending ability alone. Marketing adjectives are not evidence: SPF numbers, fragrance-free labelling and a 48-hour patch test tell you far more than any phrase on the box.
A Quick Checklist Before Buying
- Swatch three shades along the jaw in daylight, not on the wrist
- Check the swatch again after a few hours before deciding
- Match finish to how oily or dry your skin actually is by midday, not by morning
- Apply in thin layers, letting each set before adding more
- Patch test any new formula on the inner forearm for 48 hours if your skin is reactive
- Read the SPF figure and ingredient list, and treat adjectives like radiant or luxurious as decoration
This article is for general information only and does not replace personalised advice from a dermatologist or pharmacist.
Individual results vary depending on skin type, climate and application technique.